
Using the Database#
Load, query, join, write, and copy tables.
Introduction#
In this tutorial, we’ll make a database connection, load or import tables, and work with them.
To begin, we’ll make a database connection.
import pisces as ps

# connect with Oracle
session = ps.db_connect(user='scott', backend='oracle', server='my.server.edu',
                        port=1521, instance='mydb')

# connect with sqlite
session = ps.db_connect(backend='sqlite', instance='/path/to/mydb.sqlite')
You’ll need to substitute in your own username, of course.
db_connect will prompt you for your password and returns a SQLAlchemy
Session
instance, which manages database transactions. It can also take a single
fully-qualified database URL (e.g. oracle://scott:tiger@my.server.edu:1521/mydb or
sqlite:///path/to/mydb.sqlite), which is passed to
sqlalchemy.create_engine.
The returned session is bound to the database through the .bind attribute,
which is a SQLAlchemy Engine instance that specifies the database
location and drivers.
Loading Tables#
Tables can be loaded in one of three ways:
Imported from your own table definition modules
Arbitrary tables reflected from the database
Arbitrary tables reflected from the database, with enhancements
Number 1 is the recommended way, as it returns a class with useful methods like to_trace for waveform tables, default value instantiation, and easy flat file conversion.
Number 2 returns a class with none of the above enhancements.
It is good for quick table loading when you have no prior knowledge of the table or you don’t have a table prototype to use for it.
Number 3 returns a class with default value instantiation and easy flat file writing, but no other Pisces-specific class methods.
Import your defined tables#
Import tables/classes from modules where you previously defined them, as in the [previous tutorial page](Using the Database). This is the preferred way to load tables, as it offers the most flexibility and functionality.
import from mytables import Site, Wfdisc, Origin
Arbitrary tables#
If you only know the table name (and account), you can load a table using get_tables:
# Oracle account.table syntax
Site, Affil, Origin = ps.get_tables(session.bind, ['user.site', 'user.affiliation',
                                                    'user.origin'])

# SQLite syntax, no account
Site, Affil, Origin = ps.get_tables(session.bind, ['site', 'affiliation', 'origin'])
Loaded tables are just Python classes defined using SQLAlchemy’s Object Relational Mapper (ORM).
Table classes loaded together share a .metadata.
MetaData
is a Python representation of underlying SQL objects, and can be used to
issue create/add/drop statements to the database. To add tables loaded
later to the same MetaData, use the metadata= flag with the existing
instance from one of the earlier-loaded tables:
Wfdisc, Assoc = ps.get_tables(session.bind, ['user.wfdisc', 'user.assoc'], metadata=Site.metadata)

# check the table names in the metadata
print Site.metadata.tables.keys()
Tables present in your MetaData can be seen in its .tables dictionary:
['user.affiliation', 'user.site', 'user.wfdisc', 'user.origin', 'user.assoc']
Tables must have a primary key#
SQLAlchemy’s ORM needs a primary key for the session to keep track of rows. If a database table is actually just a view of other tables, or a primary key was never specified,
we can specify the primary key in a dictionary and the primary_keys= keyword.
try:
    Sitechan, = ps.get_tables(session.bind, ['user.sitechan'])
except ArgumentError:
    # failed because user.sitechan has no primary key.  we can force one with primary_keys
    Sitechan, = ps.get_tables(session.bind, ['user.sitechan'],
                                primary_keys={'user.sitechan': ['chanid']})
Arbitrary enhanced tables#
When the base= option is used with a Declarative Base class that comes with Pisces,
loaded classes get the following enhancements:
The default values for all fields in a table row (class instance) are filled whether or not the underlying database defines default values.
The class can form its own string representation (flat file row).
Instances of the class can iterate over values, and in the correct order.
Note: this will only work if the field names in the table being loaded have been used with this base before.
# load table classes, matching column names with those of a known schema

from pisces.schema.css3 import Base

Site, Affil, Origin = ps.get_tables(session.bind, ['global.site','global.affiliation', 'global.origin'], base=Base)
Base is the parent class for all pre-defined table prototypes in a given schema that comes with Pisces.
Querying Tables#
Querying and editing tables in Pisces is the same as using SQLAlchemy’s ORM. Follow SQLAlchemy’s tutorial to learn more about how this works.
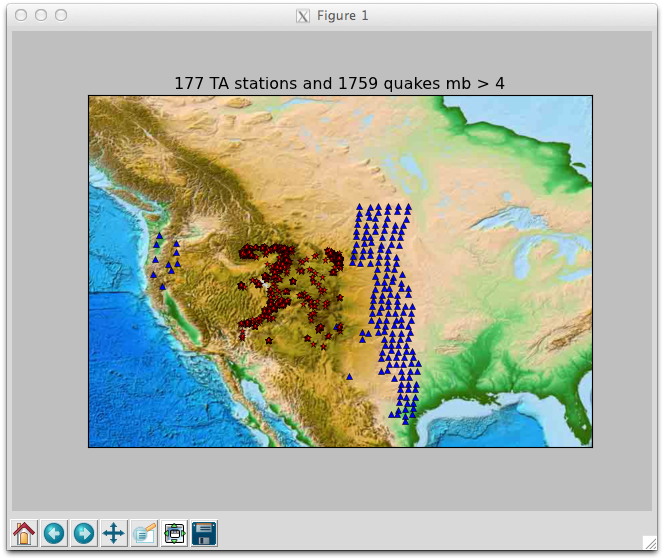
# query all TA stations installed in 2009
q = session.query(Site).filter(Site.ondate.between(2009001, 2009365))
ta_sites = q.filter(Site.sta == Affil.sta).filter(Affil.net == 'TA').all()

# query for a subset of western US earthquakes, sorted by mb
q = session.query(Origin).filter(Origin.lat.between(35, 45)).filter(Origin.mb > 4)
wus_quakes = q.filter(Origin.lon.between(-115, -105)).order_by(Origin.mb).all()

# plot 'em
import matplotlib.pyplot as plt
from mpl_toolkits.basemap import Basemap
m = Basemap(llcrnrlon=-130, llcrnrlat=25, urcrnrlon=-80, urcrnrlat=60, resolution='i')
m.etopo()

for ista in ta_sites:
    x, y = m(ista.lon, ista.lat)
    m.plot(x, y, 'b^')

for io in wus_quakes:
    x, y = m(io.lon, io.lat)
    m.plot(x, y, 'r*')

plt.title("{} TA stations and {} quakes mb > 4".format(len(ta_sites), len(wus_quakes)))
Query-builders#
Pisces has a set of intuitive query-building functions for common
seismic queries in pisces.request.
import pisces.request as req

# repeat the previous query for a subset of western US earthquakes
wus_quakes = req.get_events(session, Origin, region=(-115, -105, 35, 45), mag={'mb': (4, None)})

# to sort by mb, ask for the query back and do your sort
wus_quakes = req.get_events(session, Origin, region=(-115, -105, 35, 45), mag={'mb': (4, None)}, asquery=True).order_by(Origin.mb).all()
Pisces uses NumPy/ObsPy to do distance subsets, which are done out-of-database and can be memory intensive. They can be done in-database, if you have a stored function “xkm_distance”, for example, that calculates lateral distances.
# stations <= 200 km from lat 42, lon -110, out-of-database
sites = req.get_stations(session, Site, km=(42, -110, 0, 200))

# in-database "xkm_distance(lat1, lon1, lat2, lon2)" function
from sqlalchemy import func
sites = req.get_stations(session, Site, asquery=True).filter(func.xkm_distance(Site.lat, Site.lon, 42, -110).between(0, 200)).all()
Editing tables#
# add Albuquerque ANMO and the Chelyabinsk bolide
ANMO = Site(sta='ANMO', lat=34.9459, lon=-106.4572, elev=1.85)
bolide = Origin(orid=1, lat=55.15, lon=61.41, mb=2.7, etype='xm')
session.add_all([ANMO, bolide])
session.commit()

# edit a Site, delete an Origin
session.query(Site).filter(Site.sta == 'MK31').update({'lat': 42.5})
session.query(Origin).filter(Origin.orid = 1001).delete()
session.commit()
session.close()
Note that not all fields/attributes were specified when creating “ANMO” or “bolide”, but their default values are filled in.